

【Phaser3入門】Tilemap
Phaser3について
前の記事で軽くまとめているのでこちらを読んでみてください
Phaser3 入門
Phaser3 入門 ゲームの作成
タイルマップ作成
ゲームが小さければ直接phaserのコード内に書けば良さそうですが、
ちゃんとしたゲームを作ろうとなるとそうはいかないので
Tiledと言うレベルエディタを使って作成することを前提に考えます
Tiledで作成したマップはこんな感じです
Tiledのversionは1.4.3
sample.json
{
"compressionlevel": -1,
"height": 20,
"infinite": false,
"layers": [
{
"data": [
0,0,0,0,0,0,0,0,0,0,0,0,0,0,0,0,0,0,0,0,0,0,0,0,0,0,0,0,0,0,0,0,0,0,0,0,0,0,0,0,0,0,0,0,0,0,0,0,0,0,0,0,0,0,0,0,0,0,0,0,0,0,0,0,0,0,0,0,0,0,0,0,0,0,0,0,0,0,0,0,0,0,0,0,0,0,0,0,0,0,0,0,0,0,9,0,0,0,0,0,0,0,0,0,9,9,0,0,0,0,0,0,0,9,9,9,0,0,0,0,0,0,0,9,9,9,9,0,0,0,0,0,9,9,9,9,9,0,0,0,0,0,9,9,9,9,9,9,0,0,0,0,9,9,9,9,9,0,0,0,0,0,0,9,9,9,9,0,0,0,0,0,0,9,9,9,0,0,0,0,0,0,0,0,9,9,0,0,0,0,0,0,0,0,9,0,0,0,0,0
],
"height": 20,
"id": 1,
"name": "floor",
"opacity": 1,
"type": "tilelayer",
"visible": true,
"width": 10,
"x": 0,
"y": 0
},
{
"id": 3,
"layers": [
{
"data": [0,0,0,0,0,0,0,0,0,0,0,0,0,0,0,0,0,0,0,0,0,0,0,0,0,0,0,0,0,0,0,0,0,0,0,0,0,0,0,0,0,0,0,0,0,0,0,0,0,0,0,0,0,0,0,0,0,0,0,0,0,0,0,0,0,0,0,0,0,0,0,0,0,0,0,0,0,0,0,0,0,0,0,0,0,0,0,0,0,0,0,0,0,0,0,0,0,0,0,0,0,0,0,13,0,0,13,0,0,0,0,0,0,13,0,13,0,0,0,0,0,0,0,0,13,13,0,0,0,0,0,0,0,0,13,0,0,0,0,0,0,0,0,0,0,0,0,0,0,0,0,0,0,0,0,0,0,0,0,0,0,0,0,0,0,0,0,0,0,0,0,0,0,0,0,0,0,0,0,0,0,0,0,0,0,0,0,0,0,0,0,0,0,0,0,0,0,0,0,0
],
"height": 20,
"id": 2,
"name": "1f",
"opacity": 1,
"type": "tilelayer",
"visible": true,
"width": 10,
"x": 0,
"y": 0
},
{
"data": [0,0,0,0,0,0,0,0,0,0,0,0,0,0,0,0,0,0,0,0,0,0,0,0,0,0,0,0,0,0,0,0,0,0,0,0,0,0,0,0,0,0,0,0,0,0,0,0,0,0,0,0,0,0,0,0,0,0,0,0,0,0,0,0,0,0,0,0,0,0,0,0,0,0,0,0,0,0,0,0,0,0,0,13,0,0,13,0,0,0,0,0,0,13,0,13,0,0,0,0,0,0,0,0,13,13,0,0,0,0,0,0,0,0,13,0,0,0,0,0,0,0,0,0,0,0,0,0,0,0,0,0,0,0,0,0,0,0,0,0,0,0,0,0,0,0,0,0,0,0,0,0,0,0,0,0,0,0,0,0,0,0,0,0,0,0,0,0,0,0,0,0,0,0,0,0,0,0,0,0,0,0,0,0,0,0,0,0,0,0,0,0,0,0,0,0,0,0,0,0
],
"height": 20,
"id": 4,
"name": "2f",
"opacity": 1,
"type": "tilelayer",
"visible": true,
"width": 10,
"x": 0,
"y": 0
},
{
"data": [0,0,0,0,0,0,0,0,0,0,0,0,0,0,0,0,0,0,0,0,0,0,0,0,0,0,0,0,0,0,0,0,0,0,0,0,0,0,0,0,0,0,0,0,0,0,0,0,0,0,0,0,0,0,0,0,0,0,0,0,0,0,0,13,0,0,13,0,0,0,0,0,0,13,0,13,0,0,0,0,0,0,0,0,13,13,0,0,0,0,0,0,0,0,13,0,0,0,0,0,0,0,0,0,0,0,0,0,0,0,0,0,0,0,0,0,0,0,0,0,0,0,0,0,0,0,0,0,0,0,0,0,0,0,0,0,0,0,0,0,0,0,0,0,0,0,0,0,0,0,0,0,0,0,0,0,0,0,0,0,0,0,0,0,0,0,0,0,0,0,0,0,0,0,0,0,0,0,0,0,0,0,0,0,0,0,0,0,0,0,0,0,0,0,0,0,0,0,0,0
],
"height": 20,
"id": 5,
"name": "3f",
"opacity": 1,
"type": "tilelayer",
"visible": true,
"width": 10,
"x": 0,
"y": 0
},
{
"data": [0,0,0,0,0,0,0,0,0,0,0,0,0,0,0,0,0,0,0,0,0,0,0,0,0,0,0,0,0,0,0,0,0,0,0,0,0,0,0,0,0,0,0,14,0,0,14,0,0,0,0,0,0,14,0,14,0,0,0,0,0,0,0,0,14,14,0,0,0,0,0,0,0,0,14,0,0,0,0,0,0,0,0,0,0,0,0,0,0,0,0,0,0,0,0,0,0,0,0,0,0,0,0,0,0,0,0,0,0,0,0,0,0,0,0,0,0,0,0,0,0,0,0,0,0,0,0,0,0,0,0,0,0,0,0,0,0,0,0,0,0,0,0,0,0,0,0,0,0,0,0,0,0,0,0,0,0,0,0,0,0,0,0,0,0,0,0,0,0,0,0,0,0,0,0,0,0,0,0,0,0,0,0,0,0,0,0,0,0,0,0,0,0,0,0,0,0,0,0,0
],
"height": 20,
"id": 6,
"name": "4f",
"opacity": 1,
"type": "tilelayer",
"visible": true,
"width": 10,
"x": 0,
"y": 0
},
{
"data": [0,0,0,0,0,0,0,0,0,0,0,0,0,14,14,14,0,0,0,0,0,0,0,14,14,14,14,0,0,0,0,0,0,14,14,14,0,0,0,0,0,0,0,0,14,14,0,0,0,0,0,0,0,0,14,0,0,0,0,0,0,0,0,0,0,0,0,0,0,0,0,0,0,0,0,0,0,0,0,0,0,0,0,0,0,0,0,0,0,0,0,0,0,0,0,0,0,0,0,0,0,0,0,0,0,0,0,0,0,0,0,0,0,0,0,0,0,0,0,0,0,0,0,0,0,0,0,0,0,0,0,0,0,0,0,0,0,0,0,0,0,0,0,0,0,0,0,0,0,0,0,0,0,0,0,0,0,0,0,0,0,0,0,0,0,0,0,0,0,0,0,0,0,0,0,0,0,0,0,0,0,0,0,0,0,0,0,0,0,0,0,0,0,0,0,0,0,0,0,0
],
"height": 20,
"id": 7,
"name": "5f",
"opacity": 1,
"type": "tilelayer",
"visible": true,
"width": 10,
"x": 0,
"y": 0
}
],
"name": "object",
"opacity": 1,
"type": "group",
"visible": true,
"x": 0,
"y": 0
}
],
"nextlayerid": 11,
"nextobjectid": 1,
"orientation": "staggered",
"renderorder": "right-down",
"staggeraxis": "y",
"staggerindex": "odd",
"tiledversion": "1.4.3",
"tileheight": 16,
"tilesets": [
{
"columns": 5,
"firstgid": 1,
"image": "floor.png",
"imageheight": 160,
"imagewidth": 160,
"margin": 0,
"name": "floor",
"spacing": 0,
"tilecount": 25,
"tileheight": 32,
"tiles": [
{
"id": 0,
"properties": [
{ "name": "collision", "type": "string", "value": "true" }
]
},
{
"id": 1,
"properties": [
{ "name": "collision", "type": "string", "value": "true" }
]
},
{
"id": 2,
"properties": [
{ "name": "collision", "type": "string", "value": "true" }
]
},
{
"id": 3,
"properties": [
{ "name": "collision", "type": "string", "value": "true" }
]
},
{
"id": 4,
"properties": [
{ "name": "collision", "type": "string", "value": "true" }
]
},
{
"id": 5,
"properties": [
{ "name": "collision", "type": "string", "value": "true" }
]
},
{
"id": 6,
"properties": [
{ "name": "collision", "type": "string", "value": "true" }
]
},
{
"id": 7,
"properties": [
{ "name": "collision", "type": "string", "value": "true" }
]
},
{
"id": 8,
"properties": [
{ "name": "collision", "type": "string", "value": "true" }
]
},
{
"id": 9,
"properties": [
{ "name": "collision", "type": "string", "value": "true" }
]
},
{
"id": 11,
"properties": [
{ "name": "collision", "type": "string", "value": "true" }
]
},
{
"id": 12,
"properties": [
{ "name": "collision", "type": "string", "value": "true" }
]
},
{
"id": 13,
"properties": [
{ "name": "collision", "type": "string", "value": "true" }
]
},
{
"id": 14,
"properties": [
{ "name": "collision", "type": "string", "value": "true" }
]
}
],
"tilewidth": 32,
"transparentcolor": "#000000"
},
{
"columns": 8,
"firstgid": 26,
"image": "decoration.png",
"imageheight": 256,
"imagewidth": 256,
"margin": 0,
"name": "decoration",
"spacing": 0,
"tilecount": 64,
"tileheight": 32,
"tilewidth": 32,
"transparentcolor": "#000000"
}
],
"tilewidth": 32,
"type": "map",
"version": 1.4,
"width": 10
}
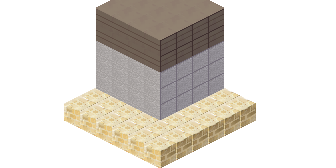
素材作り中の画像なのでちょっとアレ
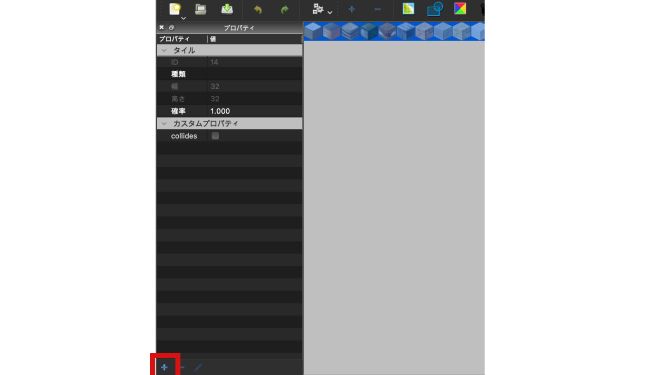
collisionがすでに設定されているのだけれど
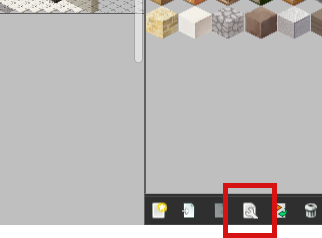
tilesetの設定の左下にある+から設定できる
タイルマップを読み込む
Viteを使ったボイラープレートを使って
index.tsに新しくシーンを追加する
import Phaser from 'phaser';
import config from './config';
import Labo from "./scenes/Labo";
new Phaser.Game(
Object.assign(config, {
scene: [
Labo,
]
})
);
config.ts
import Phaser from 'phaser';
export default {
type: Phaser.AUTO,
parent: 'game',
backgroundColor: '#333',
scale: {
width: 320,
height: 200,
mode: Phaser.Scale.FIT,
autoCenter: Phaser.Scale.CENTER_BOTH
},
physics: {
default: "arcade", // "arcade", "impact", "matter"
},
};
src/scenesの中にLabo.tsを作成してマップを読み込む
import Phaser from "phaser";
export default class Labo extends Phaser.Scene {
constructor() {
super({key: "Labo"});
}
preload(): void {
this.load.tilemapTiledJSON("map", "assets/tiles/sample.json");
this.load.image("floor", "assets/tiles/floor.png");
}
}
createStaticLayerと言う関数を用いている記事が多いが、
3.52.0では廃止になっていたのでcreateLayerを使っている
使えそうなプロパティや関数
TilemapLayer
culledTiles | カメラ内にあり表示されるタイル |
cullPaddingX | カメラ内に表示するタイルから余計に表示するタイル数(横) |
cullPaddingY | カメラ内に表示するタイルから余計に表示するタイル数(縦) |
setCullPadding | 余計に表示するタイル数を設定する、デフォルトは1 |
setCollisionByProperty | プロパティに{collides:true}を持たせると衝突判定してくれるようになる |
setDepth | z軸の値を設定できる |
斜めのタイルマップだと端の方のタイルが消えちゃったのでsetCullPaddingで設定してあげた
起きた問題
デバッグが表示されない
renderDebugの中身をみてみた
/**
* Draws a debug representation of the layer to the given Graphics. This is helpful when you want to
* get a quick idea of which of your tiles are colliding and which have interesting faces. The tiles
* are drawn starting at (0, 0) in the Graphics, allowing you to place the debug representation
* wherever you want on the screen.
*
* @method Phaser.Tilemaps.TilemapLayer#renderDebug
* @since 3.50.0
*
* @param {Phaser.GameObjects.Graphics} graphics - The target Graphics object to draw upon.
* @param {Phaser.Types.Tilemaps.StyleConfig} [styleConfig] - An object specifying the colors to use for the debug drawing.
*
* @return {this} This Tilemap Layer object.
*/
renderDebug: function (graphics, styleConfig)
{
TilemapComponents.RenderDebug(graphics, styleConfig, this.layer)
return this;
},
TilemapComponentsのRenderDebugを呼んでいる
TimemapComponents.RenderDebug
/**
* @author Richard Davey <[email protected]>
* @copyright 2020 Photon Storm Ltd.
* @license {@link https://opensource.org/licenses/MIT|MIT License}
*/
var GetTilesWithin = require('./GetTilesWithin');
var Color = require('../../display/color');
var defaultTileColor = new Color(105, 210, 231, 150);
var defaultCollidingTileColor = new Color(243, 134, 48, 200);
var defaultFaceColor = new Color(40, 39, 37, 150);
/**
* Draws a debug representation of the layer to the given Graphics. This is helpful when you want to
* get a quick idea of which of your tiles are colliding and which have interesting faces. The tiles
* are drawn starting at (0, 0) in the Graphics, allowing you to place the debug representation
* wherever you want on the screen.
*
* @function Phaser.Tilemaps.Components.RenderDebug
* @since 3.0.0
*
* @param {Phaser.GameObjects.Graphics} graphics - The target Graphics object to draw upon.
* @param {Phaser.Types.Tilemaps.DebugStyleOptions} styleConfig - An object specifying the colors to use for the debug drawing.
* @param {Phaser.Tilemaps.LayerData} layer - The Tilemap Layer to act upon.
*/
var RenderDebug = function (graphics, styleConfig, layer)
{
if (styleConfig === undefined) { styleConfig = {}; }
// Default colors without needlessly creating Color objects
var tileColor = (styleConfig.tileColor !== undefined) ? styleConfig.tileColor : defaultTileColor;
var collidingTileColor = (styleConfig.collidingTileColor !== undefined) ? styleConfig.collidingTileColor : defaultCollidingTileColor;
var faceColor = (styleConfig.faceColor !== undefined) ? styleConfig.faceColor : defaultFaceColor;
var tiles = GetTilesWithin(0, 0, layer.width, layer.height, null, layer);
graphics.translateCanvas(layer.tilemapLayer.x, layer.tilemapLayer.y);
graphics.scaleCanvas(layer.tilemapLayer.scaleX, layer.tilemapLayer.scaleY);
for (var i = 0; i < tiles.length; i++)
{
var tile = tiles[i];
var tw = tile.width;
var th = tile.height;
var x = tile.pixelX;
var y = tile.pixelY;
var color = tile.collides ? collidingTileColor : tileColor;
if (color !== null)
{
graphics.fillStyle(color.color, color.alpha / 255);
graphics.fillRect(x, y, tw, th);
}
// Inset the face line to prevent neighboring tile's lines from overlapping
x += 1;
y += 1;
tw -= 2;
th -= 2;
if (faceColor !== null)
{
graphics.lineStyle(1, faceColor.color, faceColor.alpha / 255);
if (tile.faceTop) { graphics.lineBetween(x, y, x + tw, y); }
if (tile.faceRight) { graphics.lineBetween(x + tw, y, x + tw, y + th); }
if (tile.faceBottom) { graphics.lineBetween(x, y + th, x + tw, y + th); }
if (tile.faceLeft) { graphics.lineBetween(x, y, x, y + th); }
}
}
};
module.exports = RenderDebug;
10行目を見ると初期カラーなどは設定しなくても良さそう
canvasの図形を描くgraphicsに対象のx,y座標を与えて大きさを合わせたり外線を引いてる レイヤーを引数にしているから、レイヤーごとにデバッグしてやらないといけないのか?
そう考えてコンソールに出してみたら最後によんだレイヤーが表示された
レイヤーを呼んでいるループ内でレンダリングしてやらないとダメみたい
map.createLayer()を呼んでいるループ内でmap.layerは複数レイヤのそれぞれが表示される
tilemapLayerがlayerプロパティを持っていたなと思い、renderDebugを渡してみた
// debug
let debugGraphics = this.add.graphics().setAlpha(.7).setDepth(20);
this.add.existing(debugGraphics);
debugGraphics.clear();
map.getTileLayerNames().forEach((name) => {
if (map.getLayer(name)) {
map.getLayer(name).tilemapLayer.renderDebug(debugGraphics, {
tileColor: new Phaser.Display.Color(105, 210, 231, 255),
collidingTileColor: new Phaser.Display.Color(243, 134, 48, 255),
faceColor: new Phaser.Display.Color(40, 39, 37, 255),
});
}
});
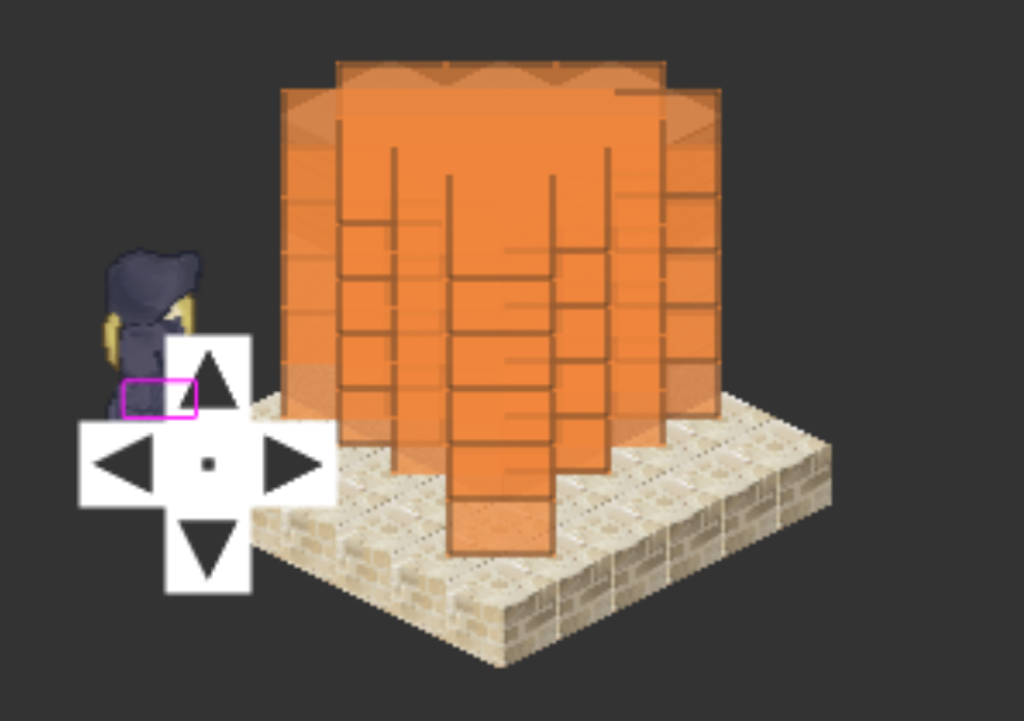
これで表示された
ループ文の回し方が雑なので修正した方が良い感じ
斜めの衝突判定に使うにはちょっと粗いな
結論
mapが複数レイヤーある時にはレイヤーごとにrenderDebugが必要
